Tutorial
Knowing how to set up valid YAML configuration files is fundamental to properly use MLWiz. Custom behavior with more advanced functionalities can be generally achieved by subclassing the individual modules we provide, but this is very much dependent on the specific research project.
Data Preprocessing
The ML pipeline starts with the creation of the dataset and of the data splits. The general template that we can use is the following, with an explanation of each field as a comment:
splitter:
  splits_folder:  # folder where to store the splits
  class_name:  # dotted path to splitter class
  args:
    n_outer_folds:  # number of outer folds for risk assessment
    n_inner_folds:  # number of inner folds for model selection
    seed:
    stratify:  # target stratification: works for classification tasks only
    shuffle:  # whether to shuffle the indices prior to splitting
    inner_val_ratio:  # percentage of validation for hold-out model selection. this will be ignored when the number of inner folds is > than 1
    outer_val_ratio:  # percentage of validation data to extract for risk assessment final runs
    test_ratio:  # percentage of test to extract for hold-out risk assessment. this will be ignored when the number of outer folds is > than 1
dataset:
  class_name:  # dotted path to dataset class
  args:  # arguments to pass to the dataset class
    arg_name1:
    arg_namen:
    # Transforms belong inside args. Each can be a dotted path or a class + args mapping.
    # pre_transform: torch.nn.Identity  # transform and store data at dataset creation time
    transform_train:  # on-the-fly transform for training data
      class_name: torchvision.transforms.RandomHorizontalFlip
      args:
        p: 0.5
    transform_eval: torch.nn.Identity  # on-the-fly transform for validation and test data
Data Splitting
We provide a general Splitter class that is able to split a dataset of multiple samples. The most important parameters
are n_outer_folds and n_inner_folds, which represent the way in which we want to perform risk assessment
and model selection. For instance:
n_outer_folds=10andn_inner_folds=1: 10-fold external Cross Validation (CV) on test data, with hold-out model selection inside each of the 10 folds,
n_outer_folds=5andn_inner_folds=3: Nested CV,
n_outer_folds=1andn_inner_folds=1: Simple Hold-out model assessment and selection, ortrain/val/testsplit.
We assume that the difference between risk assessment and model selection is clear to the reader. If not, please refer to Samy Bengio’s lecture (Part 3).
Here’s an snippet of a potential configuration file that splits a classification dataset:
splitter:
  splits_folder: examples/DATA_SPLITS/
  class_name: mlwiz.data.splitter.Splitter
  args:
    n_outer_folds: 3
    n_inner_folds: 2
    seed: 42
    stratify: True
    shuffle: True
    inner_val_ratio: 0.1
    outer_val_ratio: 0.1
    test_ratio: 0.1
Dataset Creation
To create your own dataset, you should implement the DatasetInterface interface.
Here’s an snippet of a potential configuration file that downloads and processes the MNIST classification dataset:
dataset:
  class_name: mlwiz.data.dataset.MNIST
  args:
    storage_folder: DATA/
You can also apply transform_train/transform_eval and pre_transform to process the samples at runtime or at dataset creation time, respectively.
Once our data configuration file is ready, we can create the dataset using (for the example above)
mlwiz-data --config-file examples/DATA_CONFIGS/config_MNIST.yml
Experiment Setup
Once we have created a dataset and its data splits, it is time to implement our model and define a suitable task.
Every model must implement the ModelInterface interface.
At this point, it is time to define the experiment. The general template that we can use is the following, with an explanation of each field as a comment:
dataset:
  storage_folder:  # path to DATA root folder (same as in data config file)
  dataset_class:  # dotted path to dataset class
  data_splits_file:  # path to data splits file


resources:
  device:  # cpu | cuda
  max_cpus:  # > 1 for parallelism
  max_gpus: # > 0 for gpu usage (device must be cuda though)
  gpus_per_task:  # Ray GPUs per task: fraction (<=1) or integer (>1 enables DDP)
  gpus_subset: # optional comma-separated GPU indices, e.g. 0,2


data_loading:
  dataset_getter:  # dotted path to dataset provider class
  data_loader:
    class_name:  # dotted path to data loader class
    args:
      num_workers:
      pin_memory:


reproducibility:
  seed: 42


experiment:
  result_folder:  # folder where results are stored
  exp_name:  # experiment name
  experiment:  # dotted path to experiment class
  model_selection_criteria:
    - metric: main_score
      direction: max
  evaluate_every:  # evaluate every n epochs
  risk_assessment_training_runs:
  model_selection_training_runs:
  training_timeout_seconds:  # optional; -1 disables

# Grid Search
# if only 1 configuration is selected, any inner model selection will be skipped
grid:
  model:  # dotted path to model class
  checkpoint:  # whether to keep a checkpoint of the last epoch to resume training
  shuffle:  # whether to shuffle the data
  batch_size:  # batch size (global when DDP is enabled, per-process otherwise)
  epochs:  # number of maximum training epochs

  # Model specific arguments #

  # TBD by you

  # ------------------------ #

  # Optimizer (with an example - 3 possible alternatives)
  optimizer:
    - class_name: mlwiz.training.callback.optimizer.Optimizer
      args:
        optimizer_class_name: torch.optim.Adam
        lr:
          - 0.01
          - 0.001
        weight_decay: 0.
    - class_name: mlwiz.training.callback.optimizer.Optimizer
      args:
        optimizer_class_name: torch.optim.Adagrad
        lr:
          - 0.1
        weight_decay: 0.

  # Scheduler (optional)
  scheduler: null

  # Loss metric (with an example of Additive Loss)
  loss:
    - class_name: mlwiz.training.callback.metric.AdditiveLoss
      args:
        loss_1: mlwiz.training.callback.metric.MulticlassClassification
        loss_2: mlwiz.training.callback.metric.MulticlassClassification

  # Score metric (with an example of Multi Score)
  scorer:
    - class_name: mlwiz.training.callback.metric.MultiScore
      args:
        main_scorer: mlwiz.training.callback.metric.MulticlassAccuracy
        my_second_metric: mlwiz.training.callback.metric.ToyMetric

  # Training engine
  engine:
    class_name: mlwiz.training.engine.TrainingEngine
    args:
      eval_training: False  # if True, re-compute train metrics in eval mode every evaluate_every epochs
      mixed_precision: False  # set to True to enable torch AMP autocast (CUDA/CPU)
      mixed_precision_dtype: torch.float16  # torch.float16 | torch.bfloat16

  # Gradient clipper (optional)
  gradient_clipper: null

  # Early stopper (optional, with an example of "patience" early stopping on the validation score)
  early_stopper:
    - class_name:
        - mlwiz.training.callback.early_stopping.PatienceEarlyStopper
      args:
        patience:
          - 5
        # SYNTAX: (train_,validation_)[name_of_the_scorer_or_loss_to_monitor] -> we can use MAIN_LOSS or MAIN_SCORE
        monitor: validation_main_score
        mode: max  # is best the `max` or the `min` value we are monitoring?
        checkpoint: True  # store the best checkpoint

  # Plotter of metrics
  plotter: mlwiz.training.callback.plotter.Plotter
Modular configuration groups
Experiment YAML files have five required global sections: dataset,
resources, reproducibility, data_loading, and experiment. They
also have exactly one search section: grid, random, or bayes. Flat
pre-1.7.0 experiment files are rejected; MLWiz deliberately has no legacy
fallback for the old schema.
The configuration files shipped in examples/MODEL_CONFIGS are examples,
not mandatory templates. You can organize and customize your configuration as
needed. An experiment has the required top-level structure as long as it
contains all five global keys – dataset, resources,
reproducibility, data_loading, and experiment – and exactly one of
the search keys grid, random, or bayes. The experiment will then run
provided that the values in those sections, such as referenced classes and
file paths, are valid.
Reusable files are selected through ordered defaults lists. Root defaults
compose global settings, while a defaults list inside a search section composes
only model-selection settings:
# MODEL_CONFIGS/config_MLP.yml
defaults:
  - dataset: mnist
  - resources: cpu
  - reproducibility: default
  - data_loading: torch
  - experiment: default
  - _self_

experiment:
  exp_name: mlp

grid:
  defaults:
    - optimizer:
        - adam
        - adagrad
    - search/mlp@_here_
    - _self_
  model: mlwiz.model.MLP
  epochs: 100
Terms and composition rules
defaultsAn ordered list of configuration selections. It instructs MLWiz how to build the final dictionary and is removed from that dictionary after composition.
- Config group
A directory containing named alternatives.
dataset: mnistselectsdataset/mnist.ymland, by default, packages its contents underdataset.optimizer: [adam, adagrad]selects two files from the same group._self_The current file at that exact location in the ordered defaults list. Later scalar/list values replace earlier ones and dictionaries merge recursively. If omitted, MLWiz implicitly composes
_self_last.- Nested defaults
A selected config file may have its own root defaults, so reusable fragments can be built from smaller fragments. MLWiz resolves these recursively and reports cycles. MLWiz also supports a local defaults list directly inside
grid,random, orbayes; its output stays in that search section.- Package override
The
group@package: optionsyntax changes the destination path. For example,optimizer@training.optimizer: adamwrites the selected value totraining.optimizerinstead ofoptimizer._here_A package used in search-local defaults to merge a selected mapping directly into the current search section. In the example,
search/mlp@_here_adds siblingloss,scorer, andenginekeys directly togrid._global_A package used from the root defaults list to suppress the normal group wrapper and merge a mapping at the root. It is useful when one reusable file already contains several complete top-level sections.
- Relative and absolute config paths
Paths are relative to the YAML file containing the defaults list. A leading
/resolves from the main configuration directory.- Multiple search configurations
Each selected optimizer/model/etc. file can contain one mapping or a list of alternatives. MLWiz concatenates alternatives from all selected files. Grid search expands them all; random and Bayesian search use a categorical choice and still resolve samplers nested inside the chosen alternative.
See examples/MODEL_CONFIGS/config_MLP.yml and the sibling config-group
directories for a complete example.
Data Information
Here we can specify some information about the dataset:
dataset:
  storage_folder: DATA
  dataset_class: mlwiz.data.dataset.MNIST
  data_splits_file: examples/DATA_SPLITS/MNIST/MNIST_outer3_inner2.splits
Hardware
Here we can define how many resources to allocate to parallelize different experiments:
# this will run a maximum of 4 experiments to allocate all of the 2 gpus we have.
# We use some more cpu resources to take into account potential `data loader workers <https://pytorch.org/docs/stable/data.html#multi-process-data-loading>`_.
resources:
  device: cuda
  max_cpus: 8
  max_gpus: 2
  gpus_per_task: 0.5
Practical rule for gpus_per_task:
0 < gpus_per_task < 1: run more experiments in parallel by assigning a GPU fraction to each task.gpus_per_task = 1: single-GPU training per task.gpus_per_task > 1: must be an integer; withdevice: cudaMLWiz enables Distributed Data Parallel (DDP) inside each Ray task.
If you need to force a specific subset of GPUs on a shared machine, use gpus_subset:
resources:
  device: cuda
  max_gpus: 2
  gpus_subset: 0,2
  gpus_per_task: 1
# one experiment uses 2 GPUs with DDP
# with max_gpus: 4, Ray can run up to 2 such experiments in parallel
resources:
  device: cuda
  max_cpus: 24
  max_gpus: 4
  gpus_per_task: 2
In DDP mode, MLWiz shards train/validation/test data per rank and then averages scalar evaluation metrics across ranks.
It keeps a single set of experiment artifacts (rank 0 writes logs/checkpoints/plots). If a rank fails, check
experiment.err and ddp_rank_0.log, ddp_rank_1.log, … inside the run folder.
Also, batch_size is interpreted as the global batch size and is divided by
gpus_per_task (world size) before building per-rank loaders, so it must be divisible by world size.
Automatic Mixed Precision (AMP)
You can enable AMP from the training engine section:
engine:
  class_name: mlwiz.training.engine.TrainingEngine
  args:
    mixed_precision: True
    mixed_precision_dtype: torch.float16  # torch.float16 | torch.bfloat16
When mixed_precision is enabled, MLWiz wraps forward/metric computation with torch.amp.autocast.
On CUDA, torch.float16 uses a GradScaler automatically. On CPU, requesting torch.float16 is automatically promoted
to torch.bfloat16 for compatibility. AMP works in both single-GPU and DDP runs, and each rank applies autocast locally.
Data Loading
Here we specify which DataProvider we want to use to load the data associated with the
given splits, and the DataLoader that needs to handle such data:
data_loading:
  dataset_getter: mlwiz.data.provider.DataProvider
  data_loader:
    class_name: torch_geometric.loader.DataLoader
    args:
      num_workers: 2
      pin_memory: True  # should be True when device is set to `cuda`
Experiment Details
Here we define the experiment details, including the experiment name and type, and the folder where we want to store our results:
experiment:
  result_folder: RESULTS
  exp_name: mlp
  experiment: mlwiz.experiment.Experiment
  model_selection_criteria:
    - metric: main_score
      direction: max
  evaluate_every: 3
  risk_assessment_training_runs: 3
  model_selection_training_runs: 2
  training_timeout_seconds: -1
higher_results_are_better is still supported as a legacy shortcut for a
single main_score criterion, but it cannot be used together with
model_selection_criteria.
model_selection_criteria is evaluated in order (lexicographic tie-break).
This lets you define deterministic tie-breaking across multiple metrics:
model_selection_criteria:
  - metric: main_score
    direction: max
  - metric: main_loss
    direction: min
  - metric: ToyMetric
    source: score
    direction: max
For non-main metrics (anything different from main_score and main_loss),
you must specify source as either score or loss.
By default MLWiz will run each training session until either the configured number of epochs is reached or the early
stopper halts it. If you need to cap the wall-clock time of each run, set training_timeout_seconds to a positive
value. The TrainingEngine tracks the elapsed time (including previous attempts when
resuming from checkpoints) and stops scheduling additional epochs once the limit is reached, logging the reason for the
interruption. Keeping checkpointing enabled lets you safely resume from where the timeout was triggered.
eval_training controls how training metrics are reported at evaluation time:
with False (default), MLWiz reuses training-pass aggregates (faster); with
True, it performs an explicit inference pass on the training split
(slower, but directly comparable to validation/test inference mode metrics).
Grid Search
Grid search is identified by the keyword grid after the experimental details. This is the easiest setting, in which
you can define lists associated to an hyper-parameter and all possible combinations will be created. You can even have
nesting of these combinations for maximum flexibility.
There is one config file examples/MODEL_CONFIGS/config_MLP.yml that you can check to get a better idea.
For a multi-GPU DDP setup, refer to examples/MODEL_CONFIGS/config_MLP_ddp.yml.
Random Search
Random search is identified by random. Its budget belongs inside the
random section together with the sampled model settings.
- We provide different sampling methods:
choice –> pick at random from a list of arguments
uniform –> pick uniformly from min and max arguments
normal –> sample from normal distribution requiring
mu(mean) andsigma(std)randint –> pick at random from min and max
loguniform –> pick following the reciprocal distribution from log_min, log_max, with a specified base
Example (one usage per method):
random:
  budget: 20
  batch_size:  # choice
    sample_method: mlwiz.evaluation.util.choice
    args:
      - 64
      - 128
      - 256
  weight_decay:  # uniform(min, max)
    sample_method: mlwiz.evaluation.util.uniform
    args:
      - 0.0
      - 0.001
  feature_noise_std:  # normal(mu, sigma)
    sample_method: mlwiz.evaluation.util.normal
    args:
      - 0.1   # mu
      - 0.02  # sigma
  num_layers:  # randint(min, max), closed interval [min, max]
    sample_method: mlwiz.evaluation.util.randint
    args:
      - 2
      - 6
  lr:  # loguniform(min, max, [base]); base is optional and defaults to 10
    sample_method: mlwiz.evaluation.util.loguniform
    args:
      - 0.0005
      - 0.05
      - 10
There is one config file examples/MODEL_CONFIGS/template_random_search.yml that you can check to get a better idea.
Bayesian Search
Bayesian search is identified by the keyword bayes after the experimental details.
It uses the same sampled-parameter syntax of random search (sample_method + args),
but configurations are proposed sequentially by Bayesian optimization based on previous results.
Set the optimization budget with budget and explicitly configure BO
controls with random_starts, candidate_pool_size, and ei_xi.
Minimal skeleton:
bayes:
  budget: 10
  random_starts: 2
  candidate_pool_size: 64
  ei_xi: 0.001
  batch_size:
    sample_method: mlwiz.evaluation.util.choice
    args:
      - 256
      - 512
  optimizer:
    - class_name: mlwiz.training.callback.optimizer.Optimizer
      args:
        optimizer_class_name: torch.optim.Adam
        lr:
          sample_method: mlwiz.evaluation.util.loguniform
          args:
            - 0.0005
            - 0.05
Available sample_method values are the same as random search:
choice, uniform, normal, randint, and loguniform.
Use them as mlwiz.evaluation.util.<method>.
There are two example files you can use as a starting point:
examples/MODEL_CONFIGS/template_bayes_search.yml and
examples/MODEL_CONFIGS/config_MLP_bayes.yml.
Hydra-like configuration style
MLWiz uses a lightweight, Hydra-like composition style for experiment
configuration, without requiring Hydra or OmegaConf at runtime. A main YAML
file acts as the entry point, and its ordered defaults lists select reusable
files from config-group directories such as dataset/, resources/, and
optimizer/. This makes it possible to switch a dataset, execution target,
or optimizer by changing a selection instead of copying a complete experiment
file.
The composition directives follow the rules described above: _self_
controls when the current file is merged, group@package changes the output
location, @_here_ merges a selected mapping into the current search
section, and @_global_ merges it at the configuration root. Relative paths
are resolved from the file declaring the defaults list, while paths beginning
with / are resolved from the main configuration directory. After
composition, MLWiz works with an ordinary Python dictionary; the defaults
directives do not remain in the final experiment configuration.
Composition examples
The following snippets focus on composition, so unrelated required experiment sections are omitted for brevity.
Select named files from config groups and use _self_ to control precedence:
defaults:
  - dataset: mnist       # loads dataset/mnist.yml under dataset
  - experiment: default  # loads experiment/default.yml under experiment
  - _self_               # merges this file after both selections

experiment:
  exp_name: custom_mlp   # overrides/adds to experiment/default.yml
Moving _self_ to the beginning would instead let the selected files
override conflicting values from the main file.
Select several alternatives and merge a shared search fragment in place:
grid:
  defaults:
    - optimizer:
        - adam
        - adagrad
    - search/mlp@_here_
    - _self_
  model: mlwiz.model.MLP
  epochs: 100
Here, the optimizer files become alternatives at grid.optimizer.
search/mlp@_here_ contributes keys such as loss, scorer, and
engine directly to grid instead of creating grid.search.
Use an explicit dotted package when a selection should have a different destination:
defaults:
  - optimizer@training.optimizer: adam
  - _self_
The contents of optimizer/adam.yml are placed at
training.optimizer rather than the default optimizer package.
Use @_global_ when a selected mapping already contains complete top-level
sections. A relative reference starts beside the file declaring it, whereas a
leading / starts at the main configuration directory:
defaults:
  - fragments/local_sections@_global_  # relative to this YAML file
  - /shared/cluster@_global_            # relative to the config root
  - _self_
Both selected mappings are merged directly into the configuration root without
fragments or shared wrappers.
Selected files can themselves have defaults. For example,
models/base.yml can reuse models/variant/small.yml:
# models/base.yml
defaults:
  - variant: small
  - _self_
activation: relu
# models/variant/small.yml
width: 64
Selecting models: base from the main file produces
models.variant.width: 64 and models.activation: relu. MLWiz resolves
such nested defaults recursively and reports an error if they form a cycle.
This style is optional: the files under examples/MODEL_CONFIGS demonstrate
one maintainable organization, not a required directory layout. A composed
experiment only needs the five global sections dataset, resources,
reproducibility, data_loading, and experiment, together with exactly
one search section: grid, random, or bayes.
Experiment
Once our experiment configuration file is ready, we can launch an experiment using (see below for a couple of examples)
mlwiz-exp --config-file examples/MODEL_CONFIGS/config_MLP.yml
or
mlwiz-exp --config-file examples/MODEL_CONFIGS/config_MLP_ddp.yml
By default, non-debug execution keeps only the global summary view (detailed GUI disabled). If you want per-run interactive navigation, enable it explicitly:
mlwiz-exp --config-file examples/MODEL_CONFIGS/config_MLP.yml --detailed-gui
And we are up and running!
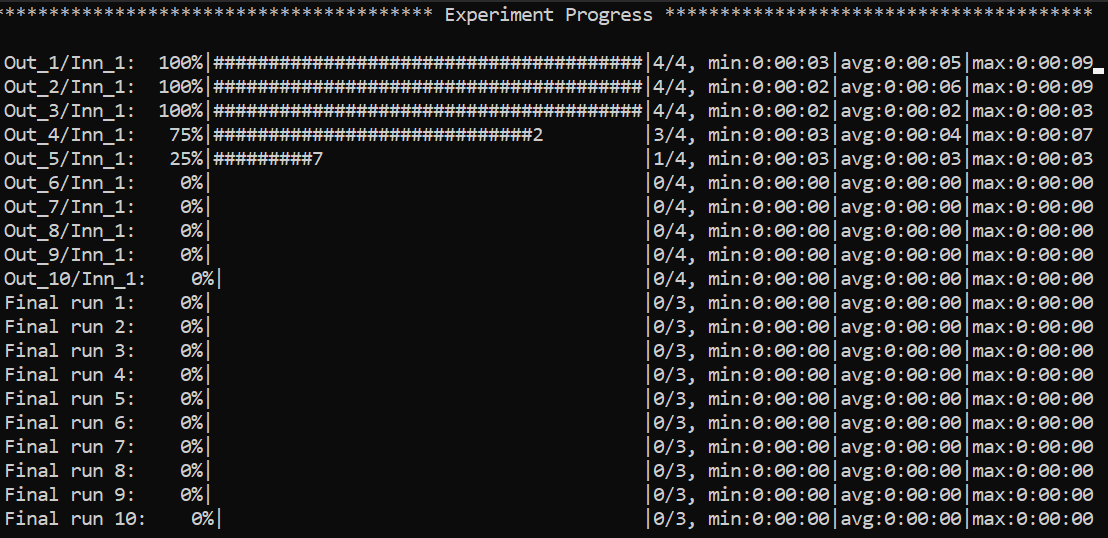
Some things to notice: because we have chosen a 3-fold CV for risk assessment with a 2-fold CV for model selection for
each external fold, you can notice in the picture there are 3*2 rows with Out_*/Inn_* written. For each of these,
we have to perform a model selection with 4 possible hyper-parameters’ configurations (progress shown on the right handside),
and each model selection experiment is run model_selection_training_runs times to mitigate the effect of bad initializations.
In addition, there are also some stats about the time required to complete the experiments.
After the 3 model selection are complete (i.e., one “best” model for each outer/external fold), it is time to re-train
the chosen models on the 3 different train/test splits. Therefore, you can notice 3 rows with Final run * written.
Since we have specified risk_assessment_training_runs: 3 in our exp. config file, we will mitigate unlucky random initializations
of the chosen models by averaging test results (of a single outer fold) over 3 training runs. The final generalization
performances of the model (a less ambiguous definition would be: the class of models you developed) is obtained,
for this specific case, as the average of the 10 test scores across the external folds. Again, if this does not make sense
to you, please consider reading Samy Bengio’s lecture (Part 3).
Navigating the live progress UI
When --detailed-gui is enabled, the progress screen is interactive. Press : to open the small prompt in the bottom-right corner, type a command, and
hit Enter to switch what is rendered without stopping the run. Useful commands:
:(or:g/:global): go back to the default overview with all progress bars.:r(or:refresh): redraw the currently selected view (handy if the terminal layout gets messy).:<outer> <run>(e.g.,:1 2): focus the risk assessment run numberrunof outer foldouter(numbers start at 1).:<outer> <inner> <config> <run>(e.g.,:2 1 3 1): focus a model selection run for a specific config inside an outer/inner fold pair.
Global overview (default view):
If an identifier is invalid or the run has not produced updates yet, MLWiz will print a short hint and keep listening so you can try again.
You can also use the arrow keys:
left/right: move across runs/configurations within the currently selected view.
up/down: toggle between the most recently visited model selection view and risk assessment view.
Focused run view (same as what you see when running with --debug):
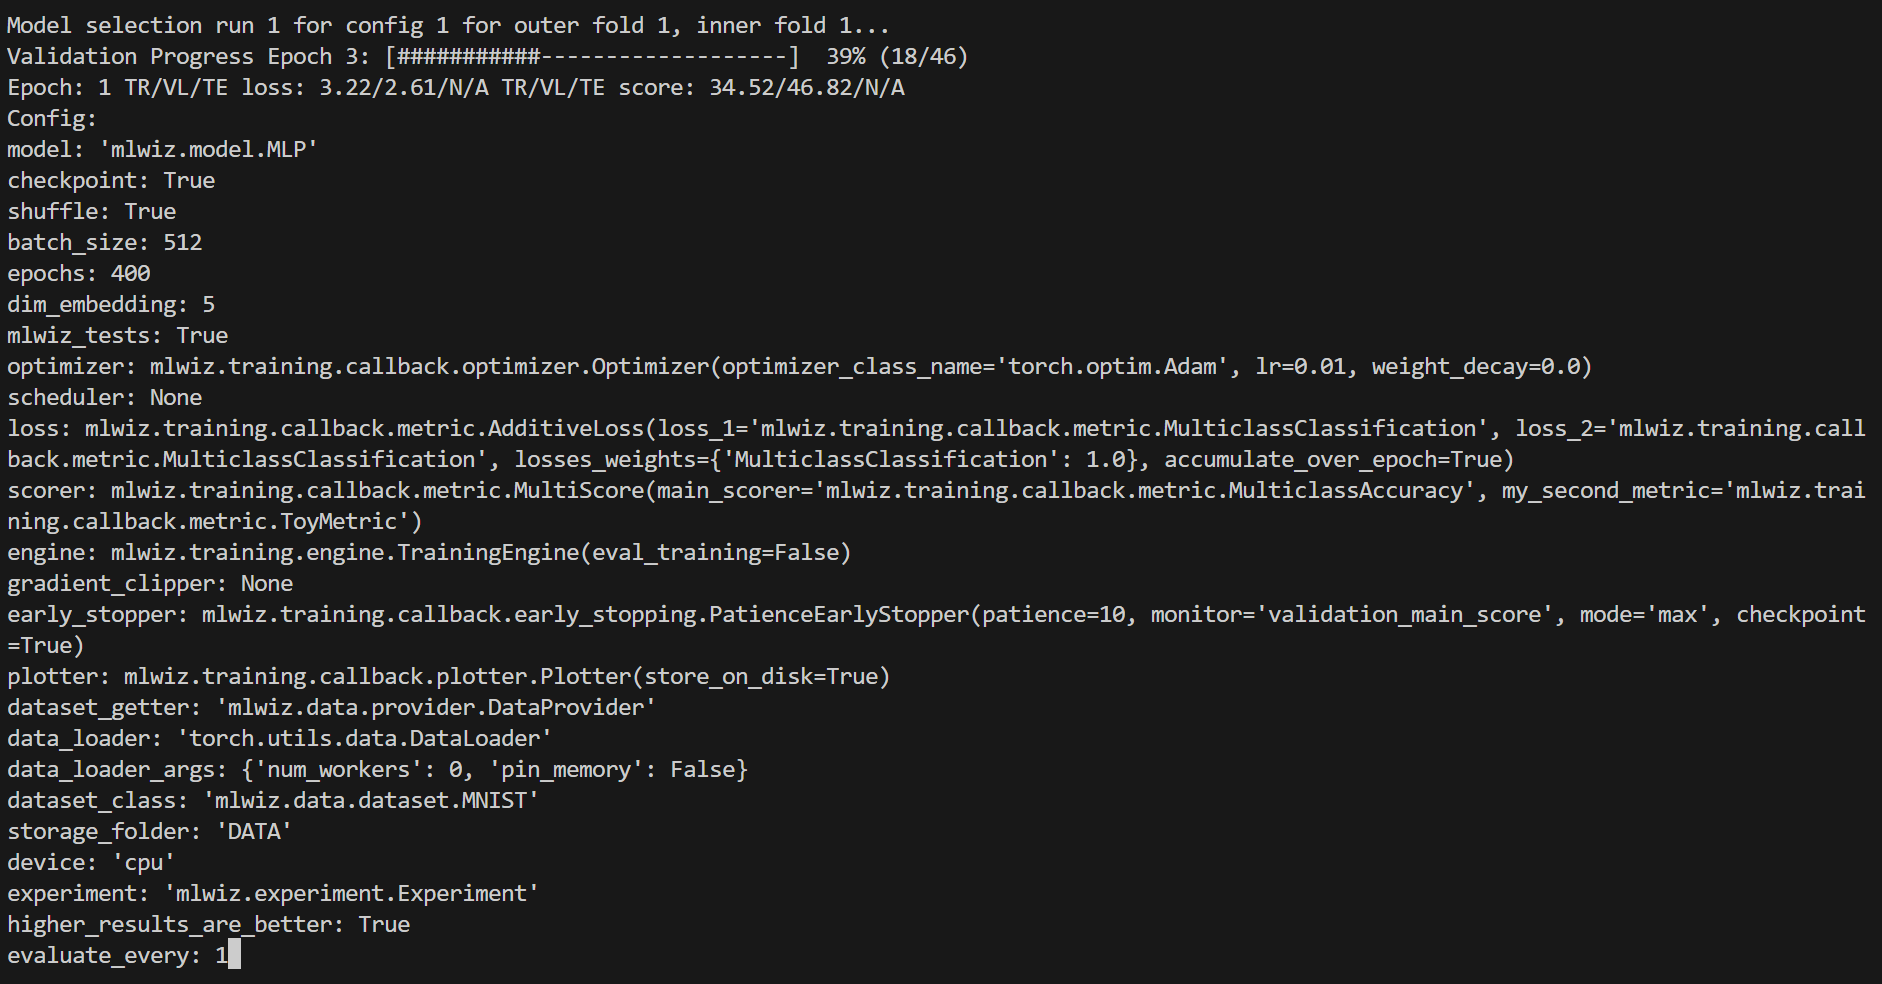
To stop the computation, use CTRL-C to send a SIGINT signal, and consider using the command ray stop to stop
all Ray processes. Warning: ray stop stops all ray processes you have launched, including those of other
experiments in progress, if any.
Useful Features to Know About
Disabling the detailed GUI
In non-debug mode, detailed GUI updates are disabled by default. This is useful to keep progress reporting lightweight during long runs.
Use:
mlwiz-exp --config-file examples/MODEL_CONFIGS/config_MLP.yml
to keep only the global summary view, or:
mlwiz-exp --config-file examples/MODEL_CONFIGS/config_MLP.yml --detailed-gui
to enable focused per-run navigation and updates.
Disabling Data Splitting Automatic Checks
Since MLWiz 1.2.0, we perform automatic checks that the training/validation/test splits are not overlapping. This is useful because everytime one implements a new data splitter for their own purposes, bugs may be easily introduced. If data split overlap is intended in your use case, you can disable the data splits checks by passing the argument –skip-data-splits-check to mlwiz-data.
Duplicating Same Model Configuration File Across Datasets
You can duplicate the same model configuration file across datasets by calling mlwiz-config-duplicator –base-exp-config <base_exp_config> –data-config-files <data_config_files>” which replaces some keywords in <base_exp_config> using information contained in the dataset configuratio files.
The new files have format <exp_name>_<dataset_name>.yml and are stored in the current working directory.
Training vs Inference Data Preprocessing
You can specify a separate preprocessing to be applied to the training data vs test data. This is useful, for instance,
when you want to randomly flip training images but you don’t want to do it at validation/test time.
You can specify the functions associated with transform_train and transform_eval as strings in the dataset’s configuration file.
You can find an example above.
Evaluating on test data at every epoch
In general, there should not be the need to store test metrics across epochs. That’s because everytime we look at test data
we are implicitly affecting our judgement, so it is good practice to evaluate on the test only at the end of risk assessment runs.
This is now the default MLWiz behavior; however, if you want to log test split metrics across epochs, you can specify it
in the TrainingEngine (in the experiment configuration file) by setting the argument eval_test_every_epoch to True.
Split checkpoint files and optimizer restore
Optimizer checkpoints now include parameter-name metadata (param_names) and MLWiz restores optimizer state by
matching parameter names whenever possible, instead of relying only on parameter order.
This is particularly useful in dynamic settings where the module declaration order may change between runs (for example, enabling/disabling optional blocks, injecting adapters, or refactoring model construction) while parameter names remain stable. In those cases, momentum/Adam moments are remapped to the correct tensors when resuming from a checkpoint.
For older checkpoints that do not contain param_names, MLWiz falls back to the legacy order-based loading behavior.
Starting with MLWiz 1.7, last_checkpoint.pth and best_checkpoint.pth
contain the model and run metadata only. Optimizer, scheduler, and AMP scaler
state is saved separately in last_optimizer_checkpoint.pth and
best_optimizer_checkpoint.pth. This lets inference utilities and the
dashboard inspect model weights without deserializing large optimizer tensors.
When a separate optimizer file is absent, resume automatically falls back to
the state embedded in a pre-1.7 model checkpoint.
Executing a specific configuration only (debug only!)
When debugging a specific configuration, perhaps because it is crashing unexpectedly,
you can focus on its execution by passing the arguments --debug --execute-config-id [config_id]
to mlwiz-exp. Valid IDs start from 1 to the maximum number of configurations tried.
In general, this argument will prioritize the execution of a specific configuration whenever model selection is run for
an outer fold. It cannot be used together with --skip-config-ids.
Skipping a set of configurations
Sometimes, a specific configuration may take a long time to finish training, and you do not want to wait for it.
You can skip its execution during model selection (note: for all outer folds!)
by passing the argument --skip-config-ids [config_id1] [config_id2] ...
to mlwiz-exp. This will ignore the specified configurations across all outer folds and continue with the remaining
experiments. It cannot be used together with --execute-config-id.
Storing logged metrics on disk
The Plotter stores epoch-wise metrics for MLWiz Dashboard in a PyTorch file
called metrics_data.torch. Storage is enabled by default and the file is
flushed after every epoch. Set store_every_N_epochs to a larger positive
integer to reduce the write frequency, or to None to flush only when
training terminates. Metrics are stored in a dictionary with separate keys for
losses and scores.
Loading and storing graphs
We moved to dill to save and load in-memory datasets because of some security warnings being issued by Pytorch save and load methods.
However, using dill to load and store PyG graphs appears to be extremely inefficient. Because newer versions of PyG
(>=2.6.0) define all the required safe_globals, we decided to continue using torch.save and torch.load for graphs.
Whenever you create your own graph dataset by subclassing DatasetInterface, please make sure you override the static methods
_save_dataset and _load_dataset by calling torch.save and torch.load, respectively.
Inspecting Results
According to our configuration file, the results are stored in the RESULTS folder. The hierarchy of folder is the following:
mlp_MNIST
|__ MODEL_ASSESSMENT
    |__ assessment_results.json  # contains the risk assessment results (average of the outer fold results)
    |__ OUTER_FOLD_1
    ...
    |__ OUTER_FOLD_5
        |__ outer_results.json  # contains the aggregated results of the three final runs
        |__ final_run_1
        |__ final_run_2
            |__ metrics_data.torch  # epoch-wise losses and scores for MLWiz Dashboard
            |__ experiment.log  # log file with profiling information
            |__ experiment.err  # uncaught exception tracebacks, when a run fails
            |__ best_checkpoint.pth  # torch dict holding the "best" checkpoint information according to the early stopper used
            |__ last_checkpoint.pth  # torch dict holding the checkpoint information of the last epoch (top ``checkpoint`` keyword set to true)
            |__ run_2_results.dill  # dict holding the results of the 2nd final run on the 5th outer fold.
        |__ final_run_3
        |__ MODEL_SELECTION  # files regarding the model selection inside the 5th outer fold
            |__ winner_config.json  # contains the "best model" across the inner folds (in this case just 1 inner fold) for the 5th fold to be used in the final training runs
            |__ config_1
            |__ config_2
            |__ config_3
                |__ config_results.json  # contains the aggregated results of the K inner model selection folds
                |__ INNER_FOLD_1  # first (and only in this case) inner model selection fold
                    |__ run_1
                        |__ metrics_data.torch
                        |__ experiment.log  # log file with profiling information
                        |__ experiment.err  # uncaught exception tracebacks, when a run fails
                        |__ best_checkpoint.pth
                        |__ last_checkpoint.pth
                    |__ run_2
                    |__ fold_1_results.info  # torch dict holding detailed results of the 2 runs of 3rd configuration on 1st inner fold.
                    |__ fold_1_results.dill  # dict holding summary results of the 1st fold results of the 3rd configuration, needed to compute config_results.json
                |__ INNER_FOLD_2
            |__ config_4
    ...
    |__ OUTER_FOLD_10
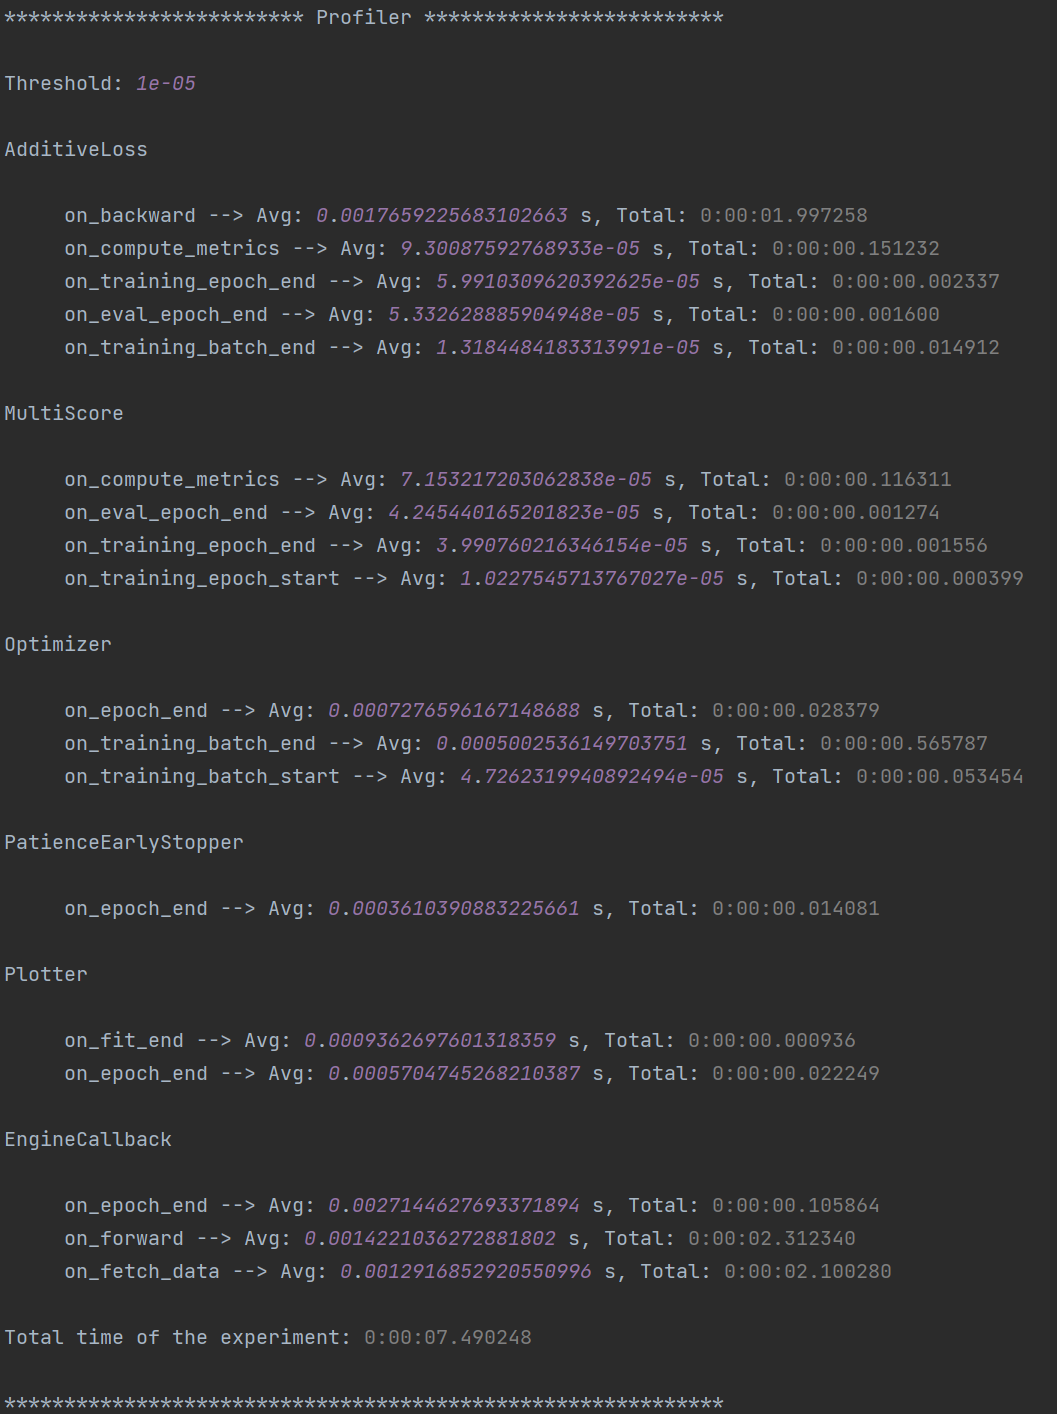
Profiling Information
Inside each experiment.log file, you will find training logs and, at the end of each training, the profiler information
with the per-epoch and total time required by each EventHandler, provided the
time spent is non-negligible (threshold specified in the log file).
If a run crashes with an uncaught exception, the traceback is also appended to experiment.err in the same run folder.
Here’s what it looks like:
MLWiz Dashboard
MLWiz also ships a result browser tailored to its model-selection and risk
assessment hierarchy. Start it from a directory containing your RESULTS
folder:
mlwiz-dashboard --logdir RESULTS
Then open the URL printed by the command. The sidebar groups runs by experiment,
outer fold, model-selection configuration, inner fold, and final run. Clicking
a configuration compares the histories from all of its child runs, while
clicking a run focuses on that run only. The dashboard reads
metrics_data.torch written by the
Plotter described above.
Model Selection Analysis
The ordinary run browser is useful for inspecting a particular configuration
or run. The separate Model Selection Analysis tab answers a different
question: how did recorded quantities behave for each value of a tried
hyperparameter? It reads the live model-selection runs for one experiment,
outer fold, and inner fold, so its plots update as new epochs are flushed to
metrics_data.torch.
Choosing the analysis scope
Open Model Selection Analysis, then select an Experiment, Outer
fold, and Inner fold. MLWiz recursively flattens each configuration into
dotted leaf names such as engine.args.eval_training. A leaf is offered in
Group by only when at least two distinct values occur in the selected fold
pair; a constant setting cannot explain a difference and is therefore hidden.
The grouping operation is intentionally marginal. With one selected hyperparameter, each curve, bar, or distribution averages all available runs whose configurations share that value, including configurations that differ in other hyperparameters. Adding a second hyperparameter conditions on the pair of values, while still averaging over any remaining configuration differences. Legends, tooltips, and tables report run counts so unequal or still-growing groups remain visible.
Quantities are discovered from numeric histories in metrics_data.torch.
This includes the standard losses and scores groups and suitable custom
data written by a Plotter subclass.
The normalizer accepts:
one numeric value per epoch;
nested dictionaries containing numeric epoch histories;
lists of dictionaries with stable keys across epochs; and
rectangular numeric matrices shaped as epochs × layers/components (with higher-dimensional rectangular values recursively split into components).
Related names ending in layer_N or component_N are presented as one
family. Selecting that family creates a separate card for every member for
both Trend and Metric vs Hyper-Parameter analyses. This is useful for widths,
per-layer norms, attention statistics, and similar data where inspecting one
layer at a time would hide the overall behavior.
Adding and managing plots
Choose a plot type and quantity in the controls at the top, then click Add
plot. Adding another plot never replaces the existing plots, even when its
type differs. Every card has independent Group by and presentation
controls, an × button for removal, and an expand/shrink button. Changing a
card’s grouping or display mode preserves its position on the page. Plot
definitions, expansion state, and 3D cameras also remain stable across the
dashboard’s automatic refreshes.
The available plot types have different aggregation semantics:
- Trend Plots
For every value of the selected hyperparameter, MLWiz aligns the recorded epochs and plots their mean with a standard-deviation band. The legend maps each line to its hyperparameter value and reports the latest mean ± standard deviation and number of contributing runs. Choose 3D and a Second parameter to separate curves by a second hyperparameter while retaining epoch and the recorded quantity as the other axes. The default 2D view remains available.
- Combined Trends
This always-3D view combines two epoch histories. Its axes are epoch, the first quantity, and the second quantity; one trajectory is drawn for each value of the selected hyperparameter. Compatible multi-layer/component families are paired automatically, so related information is rendered together rather than hidden behind another selector.
- Metric vs Hyper-Parameter
This view reduces every run to one value before grouping it. MLWiz first uses the metric snapshot stored in
best_checkpoint.pth. If that exact metric is absent but the checkpoint records its best epoch, the value at that epoch is used; otherwise the last finite recorded epoch is used. The resulting run values are grouped by hyperparameter value (or value pair), and their mean and population standard deviation are displayed.In 2D, Histogram draws one mean bar and deviation whisker per hyperparameter value. Violin displays the run distribution and can overlay Raw points. With a second hyperparameter, Histogram becomes a 3D heatmap-bar grid: the two horizontal axes contain the tried hyperparameter values, while bar height and heatmap color both encode the mean metric. Missing combinations remain gaps. Violin remains available in 3D. Enable Log scale for strictly positive values, or switch the individual plot to Markdown table to copy exact means, deviations, run counts, and value sources.
Interacting with 3D plots
Drag a 3D canvas to rotate it and use the mouse wheel to zoom. Align view X, Y, or Z looks directly along the selected axis; aligning the heatmap-bar grid with Y gives a compact top-down heatmap, while an oblique or X/Z-aligned view exposes bar heights. Hover a trend at an epoch or a heatmap/violin mark to show its hyperparameter values, mean, standard deviation, and contributing run count. Use the expand button when dense labels or many component plots need more room.
Recording a family of custom curves
The MLP example includes a deliberately simple
WidthPlotter configuration:
grid:
  # ... model and training settings ...
  plotter:
    - class_name: mlwiz.training.callback.plotter.WidthPlotter
      args:
        store_on_disk: true
WidthPlotter appends one list of layer output widths after each epoch, so
metrics_data.torch contains an epochs × layers model_widths
matrix. Run the example and open the analysis tab with:
mlwiz-exp --config-file examples/MODEL_CONFIGS/config_MLP.yml
mlwiz-dashboard --logdir RESULTS --open
Select model widths once and the dashboard creates one card per layer. A
fixed MLP produces flat width curves; a model that replaces or resizes layers
during training produces changing curves. A custom plotter can expose other
families using the same layout, for example by appending a numeric list to
self.stored_metrics["layer_norms"] at every epoch. Keep the matrix
rectangular across epochs and use None for an individual missing numeric
observation rather than changing the number of components.
Interpretation notes
The plots describe associations within the tried search space; they do not by themselves establish that a hyperparameter caused a metric change. In particular, marginal one-parameter plots average over the other search dimensions, and live analyses may temporarily contain unequal numbers of runs. Best-checkpoint comparisons are most meaningful when runs use comparable early stopping monitors and checkpoint policies. Use the reported group sizes and the raw-point violin option to inspect variability before choosing a model.
Filtering Configurations for Post-processing of Results
You can use some utilities we provide to focus on a specific set of configurations after your experiments are terminated. Assuming you run mlwiz-exp –config-file examples/MODEL_CONFIGS/config_MLP.yml inside the MLWiz repo, you can then do something like
from mlwiz.evaluation.util import retrieve_experiments, filter_experiments

configs = retrieve_experiments('RESULTS/mlp_MNIST/MODEL_ASSESSMENT/OUTER_FOLD_1/MODEL_SELECTION/')
print(len(configs))  # returns 20 for the current example configuration

filtered_configs = filter_experiments(configs, logic='OR', parameters={'Multiclass Classification': 1, 'lr': 0.001})
print(len(filtered_configs))  # depends on the recorded metric values
Converting Results to a DataFrame for Post-processing
Additionally, if you want to convert the list of configurations to a pandas DataFrame, you can use the
create_dataframe utility. This is useful if you want to perform some post-processing of the results, such as
configs_df = create_dataframe(config_list=filtered_configs,
                              key_mappings=[("dim_embedding", int), ("num_layers", int),
                                            ("lr", float), ("avg_validation_score", float)])
You can specify the type or a function that processes the value of the key in the configuration file, so that it is ready for later plotting for instance.
Exporting Assessment Results to LaTeX
When you need a publication-ready table summarizing multiple experiments, rely on the helper located in
mlwiz/evaluation/util.py. The function create_latex_table_from_assessment_results accepts a list of
(experiment_folder, model_name, dataset_name) tuples, reads the aggregated assessment JSON files, and formats them
as a LaTeX table that already includes the corresponding standard deviations.
from mlwiz.evaluation.util import create_latex_table_from_assessment_results

experiments = [
    ("RESULTS/mlp_MNIST", "MLP", "MNIST"),
    ("RESULTS/dgn_PROTEINS", "DGN", "PROTEINS"),
]

latex_table = create_latex_table_from_assessment_results(
    experiments,
    metric_key="main_score",
    no_decimals=3,
    model_as_row=True,
    use_single_outer_fold=False,
)

print(latex_table)
You can change metric_key to any metric stored in the assessment files, customize the rounding through
no_decimals, and decide whether models or datasets are rendered as rows with model_as_row. Setting
use_single_outer_fold=True is handy when the experiment only used a single outer fold and you still want the final
runs’ standard deviation to be reported in the LaTeX output.
Comparing Statistical Significance Between Models
When you need to quantify whether a highlighted model is statistically better than others, use the helper
statistical_significance. It automatically chooses the right samples: if multiple outer folds are present,
it uses the outer-fold averages; otherwise it falls back to the final runs of the single outer fold. A Welch t-test
is applied with a 95% confidence level by default.
from mlwiz.evaluation.util import statistical_significance

reference = ("RESULTS/mlp_MNIST", "MLP", "MNIST")
competitors = [
    ("RESULTS/baseline1_MNIST", "B1", "MNIST"),
    ("RESULTS/baseline2_MNIST", "B2", "MNIST"),
]

df = statistical_significance(
    highlighted_exp_metadata=reference,
    other_exp_metadata=competitors,
    metric_key="main_score",
    set_key="test",
    confidence_level=0.95,
)

print(df)
The resulting DataFrame includes mean/std/CI for the reference and each competitor, the sample source (outer fold means or final runs), the p-value of the two-sided test, and a boolean flag indicating if the difference is significant at the requested confidence level.
Loading Model for Inspection in a Notebook
We provide utilities to use your model immediately after experiments end to run additional analyses. Here’s how:
from mlwiz.evaluation.util import *

config = retrieve_best_configuration('RESULTS/mlp_MNIST/MODEL_ASSESSMENT/OUTER_FOLD_1/MODEL_SELECTION/')
splits_filepath = 'examples/DATA_SPLITS/MNIST/MNIST_outer3_inner2.splits'
device = 'cpu'

# instantiate dataset
dataset = instantiate_dataset_from_config(config)

# instantiate model
model = instantiate_model_from_config(config, dataset)

# load model's checkpoint, assuming the best configuration has been loaded
checkpoint_location = 'RESULTS/mlp_MNIST/MODEL_ASSESSMENT/OUTER_FOLD_1/final_run1/best_checkpoint.pth'
load_checkpoint(checkpoint_location, model, device=device)

# you can now call the forward method of your model
y, embeddings = model(dataset[0])

# ------------------------------------------------------------------ #
# OPTIONAL: you can also instantiate a DataProvider to load TR/VL/TE splits specific to each fold

data_provider = instantiate_data_provider_from_config(
    config,
    splits_filepath,
    n_outer_folds=3,
    n_inner_folds=2,
)
# select outer fold 1 (indices start from 0)
data_provider.set_outer_k(0)
# select inner fold 1 (indices start from 0)
data_provider.set_inner_k(0)

# set exp seet for workers (does not affect inference)
data_provider.set_exp_seed(42)  # any seed

# load loaders associated with final runs of outer 1 split
train_loader = data_provider.get_outer_train()
val_loader = data_provider.get_outer_val()
test_loader = data_provider.get_outer_test()

# Please refer to the DataProvider documentation to use it properly.
# ------------------------------------------------------------------ #
Telegram Bot
Once you have a Telegram bot token and chat id, it is super easy to set up automatic reporting of the main results!
Create a file telegram_config.yml in the main project folder, and set it up like this:
bot_token: [YOUR TOKEN]
bot_chat_ID: [YOUR CHAT ID]

log_model_selection: True  # logs the best config for each outer fold (validation score)
log_final_runs: True  # logs the outcome of the final runs for each outer fold (test score)
Inside your experiment configuration file (see example in examples/MODEL_CONFIGS/config_MLP.yml), it is sufficient
to specify your telegram configuration file by adding:
# Telegram Bot
telegram_config_file: telegram_config.yml
And that’s all you have to do to start receiving messages when the model selection/final runs for a specific fold end! You will also receive a message when the experiment terminates with the test score.